Aktualisierungen August, 2010 Kommentarverlauf ein-/ausschalten | Tastaturkürzel

  • Andreas Höhmann 17:59 am Friday, 27. August 2010 Permalink |
    Tags: Checkbox, , Renderer,   

    Fix for Tomahawk checkbox with disabled SelectItems 

    Today I will publish a little bugfix for tomahawk <t:checkbox/> issue  1436.

    I’m using tomahawk 1.1.7 the current development version is 1.1.9, the  issue „t:checkbox disregards disabled property“ is still unresolved.

    So here is the solution …

    I wrote my own HtmlCheckboxRenderer:

    /**
     * Fix for issue https://issues.apache.org/jira/browse/TOMAHAWK-1436.
     * The renderer should evaluate the "disabled" state for a each {@link SelectItem} too.
     */
    public class HtmlCheckboxRendererFix1436 extends HtmlCheckboxRenderer {
    
     @Override
     protected void renderSingleCheckbox(final FacesContext facesContext,
                                         final HtmlCheckbox checkbox) throws IOException {
       // copied from original
       final String forAttr = checkbox.getFor();
       if (forAttr == null) {
          throw new IllegalStateException("mandatory attribute 'for'");
       }
       final int index = checkbox.getIndex();
       if (index < 0) {
          throw new IllegalStateException("positive index must be given");
       }
       final UIComponent uiComponent = checkbox.findComponent(forAttr);
       if (uiComponent == null) {
          throw new IllegalStateException("Could not find component '" + forAttr
          + "' (calling findComponent on component '"
          + checkbox.getClientId(facesContext) + "')");
       }
       if (!(uiComponent instanceof UISelectMany)) {
          throw new IllegalStateException("UISelectMany expected");
       }
       final UISelectMany uiSelectMany = (UISelectMany) uiComponent;
       final Converter converter = getConverter(facesContext, uiSelectMany);
       final List selectItemList = RendererUtils.getSelectItemList(uiSelectMany);
       if (index >= selectItemList.size()) {
         throw new IndexOutOfBoundsException("index " + index + " >= " + selectItemList.size());
       }
       final SelectItem selectItem = (SelectItem) selectItemList.get(index);
       final Object itemValue = selectItem.getValue();
       final String itemStrValue = getItemStringValue(facesContext, uiSelectMany, converter, itemValue);
       final Set lookupSet = RendererUtils.getSelectedValuesAsSet(facesContext, uiComponent, converter, uiSelectMany);
       final ResponseWriter writer = facesContext.getResponseWriter();
       writer.startElement(HTML.LABEL_ELEM, uiSelectMany);
    
       // FIX 1436 isDisabled should check selectitem too!
       //          || selectItem.isDisabled()
       renderCheckbox(facesContext, uiSelectMany, itemStrValue, selectItem.getLabel(),
                      isDisabled(facesContext, uiSelectMany) || selectItem.isDisabled(),
                      lookupSet.contains(itemStrValue), false, index);
       // FIX 1436 isDisabled should check selectitem too!
    
       writer.endElement(HTML.LABEL_ELEM);
     }
    }
    

    and put it in my faces-config.xml:

    <render-kit>
      <render-kit-id>HTML_BASIC</render-kit-id>
      <renderer>
        <!-- fixed org.apache.myfaces.renderkit.html.ext.HtmlCheckboxRenderer issue 1436 -->
        <component-family>org.apache.myfaces.Checkbox</component-family>
        <renderer-type>org.apache.myfaces.Checkbox</renderer-type>
        <renderer-class>org.apache.myfaces.renderkit.html.ext.HtmlCheckboxRendererFix1436</renderer-class>
      </renderer>
    </render-kit>
    

    With this changes the following example will work:

    <a4j:form>
     <t:selectManyCheckbox id="name" layout="spread">
       <f:selectItem itemValue="0" itemLabel="foo"        itemDisabled="true"/>
       <f:selectItem itemValue="1" itemLabel="bar"        />
       <f:selectItem itemValue="2" itemLabel="hustensaft" />
     </t:selectManyCheckbox>
     <h:panelGrid>
       <t:checkbox for="name" index="0"  />
       <t:checkbox for="name" index="1"  />
       <t:checkbox for="name" index="2"  />
     </h:panelGrid>
    </a4j:form>
    

    The first checkbox should be disabled:

    That’s it 😀

     
  • Andreas Höhmann 9:54 am Wednesday, 2. December 2009 Permalink |
    Tags: ActionListener, PropertyActionListener   

    JSF Tip – execution order for ActionListener and PropertyActionListener 

    Until now I don’t notice this:

    According to the book ‚Core JSF Programming‘, the method that is binded to ‚actionListener‘ attribute in component tag will always been invoked earlier than the method of <f:actionListener>. In my opinion, <f:setPropertyActionListener> is a kind of <f:actionListener>. Therefore, its method will not be invoked until ‚actionListener‘ attribute method finished. I have made a test and it proved my guess.

    Found here.

     
  • Andreas Höhmann 16:35 am Monday, 16. November 2009 Permalink |
    Tags: , , , ,   

    Richfaces modal panel default formular action 

    Each input dialog should have a default action for good useability.

    If the user hit ‚Enter‘ then the default action should execute.

    Here is my example of a richfaces modal edit dialog for such a requirement …

    The dialog have input fields and 3 actions:

    • save – is the default action if the user hit ‚Enter‚ anywhere in the formular
    • cancel – is the default action if the user hit ‚Esc‚ anywhere in the formular
    • reset
    <modalPanel id="edit_dialog">
      <a4j:form id="edit_form" ajaxSubmit="true">
    
        <!-- some fields ... -->
        <outputLabel value="What's your title:" for="title"/>
        <inputText  id="title" value="#{bean.title}"/>
        <outputLabel value="What's your name:" for="name"/>
        <inputText  id="name" value="#{bean.name}"/>
    
        <!-- the actions ... -->
        <a4j:commandButton id="save" value="Save" action="#{bean.save}" type="submit"
             oncomplete="if(#{facesContext.maximumSeverity==null}) Richfaces.hideModalPanel('edit_dialog')"/>
             <!-- if no error then close the edit-dialog ... 
                    is not necessary if you don't use dialogs -->
    
         <a4j:commandButton id="reset" value="Reset" action="#{bean.reset}"
              limitToList="true" reRender="edit_form" ajaxSingle="true" type="reset"/>
    
         <a4j:commandButton id="cancel" value="Cancel" action="#{bean.cancel}" ajaxSingle="true"
              oncomplete="Richfaces.hideModalPanel('edit_dialog')"/>
    
         <!-- the default actions for the formular 'onEnter' and 'onEsc' ... -->
         <rich:hotKey key="return" selector="#edit_form"
             handler="${rich:element('edit_form:save')}.click();event.stopPropagation();event.preventDefault(); return false;"
             disableInInput="false"/>
    
         <rich:hotKey key="esc" selector="#edit_form"
             handler="${rich:element('edit_form:cancel')}.click();event.stopPropagation();event.preventDefault(); return false;"
             disableInInput="false"/>
    
       </a4j:form>
    </rich:modalPanel>
    

    It’s important to define ajaxSubmit=“true“ for the form! This avoid „none ajax submit of html formulars“. I will explain this in a later blog 🙂

    With rich:hotKey I bind 2 key events to the edit formular:

    • on ‚enter‘ – the handler click the save button
    • on ‚esc‘ – the handler click the cancel button

    Try it 😀

     
    • hicham7412 23:20 am Mittwoch, 23. Juni 2010 Permalink | Zum Antworten anmelden

      Hi Andreas,

      interesting post, I am just wondering why you always put return false; in the handler of the hotKey.

      • Andreas Höhmann 8:40 am Donnerstag, 24. Juni 2010 Permalink | Zum Antworten anmelden

        I do this because it would stop the event propagation … Do you think this is not necessary?

        event.stopPropagation();event.preventDefault();return false;

    • ikren05 3:34 am Montag, 23. August 2010 Permalink | Zum Antworten anmelden

      hi!
      i’ve just done the same.. clicking enter saves the changes. clicking esc does nothing.. anyone, please help.. thank you in advance 😀

    • dominic89 16:14 am Donnerstag, 26. August 2010 Permalink | Zum Antworten anmelden

      hi,

      I tried a little diffrent way to close the ModalPanel. I have a Textinputfield with attribute required =“true“.
      If I press the save button the ModalPanel is empty (no Text,Fields and Buttons are shown) but it doesn’t close.

      Maybe you have an idea why the panel doesn’t close

      thank you in advance

    • rajendraj 7:44 am Dienstag, 31. August 2010 Permalink | Zum Antworten anmelden

      Hai Andreas,
      I am new to rich faces; I am using calendar component i can able select the date from the calendar component, now i am trying to enter date into the calendar component for that i have used enable manual inout = ‚true‘ and i am able to enter date into the calendar component.I have kept the datepattern =’dd-MMM-yyyy‘ so accordingly i am able to enter date. Now my question or functionality is:

      Q. I need to enter date manually into the calendar component like:31082010
      after an event like onblur or onenterkeypress it should change the pattern into user defined format like(31-Aug-2010).
      How to achieve in the calendar component, Is it same like text field entry??
      Please explain me how to do that???

    • rajendraj 7:46 am Dienstag, 31. August 2010 Permalink | Zum Antworten anmelden

      I forgot to tell; I have asked this question in rich faces forums also, please tell how to achieve the above functionality?? Thanks in advance Andreas

  • Andreas Höhmann 15:57 am Monday, 16. November 2009 Permalink |
    Tags: focus, , , , rich,   

    Richfaces modal panel autofocus first input element 

    With jQuery it’s easy to focus the first visible input element (textfield, textarea or selectbox) for a rich:modalPanel:

    <rich:modalPanel onshow="autofocus('dialog_content')">
      <h:panelGrid id="dialog_content" columns="1" width="100%" cellpadding="0" cellspacing="0">
         <a4j:form ajaxSubmit="true">
           <h:outputLabel value="What's your name:" for="name"/>
           <h:inputText  id="name" value="#{bean.name}"/>
           ...
           <a4j:commandButton id="save" value="Save my name" action="save"/>
         </a4j:form>
      </h:panelGrid>
    </rich:modalPanel>
    
    function autofocus(containerId) {
      var element = jQuery(":input:not(:button):visible:enabled:first", '#'+containerId);
      if (element != null) {
        element.focus().select();
      }
    }
    
     
  • Andreas Höhmann 15:50 am Friday, 6. November 2009 Permalink |
    Tags: backspace, disable, , javascript, , ,   

    Disable backspace key in a Richfaces application 

    If you want disable the Backspace key in your JSF Richfaces application put this in your view:

    <rich:hotKey key="backspace" handler="return false;" disableInInput="true"/>
    

    This will register a jQuery Hotkey handler for the document. The handler is not reqistered for input elements because in input fields you need the backspace ;-). Tested for FF3 and IE6.

    Then I found out that the following snippet doesn’t work:

    <rich:hotKey key="backspace"
                 disableInInput="true"
                 handler="alert('Backspace is disabled'); return false;" />
    

    The Browser open the alert box and go to the previous page (in background?!). But there is a fix for that:

    <rich:hotKey key="backspace"
                 disableInInput="true"
                 handler="alert('Backspace is disabled'); event.stopPropagation(); event.preventDefault(); return false;" />
    

    The event variable is available in the handler function (see org.richfaces.renderkit.html.HotKeyRenderer method doEncodeEnd).

     
  • Andreas Höhmann 13:42 am Thursday, 10. September 2009 Permalink |
    Tags: collapse, , expand, rich faces,   

    Customized Richfaces Tree 

    Yesterday I had to customize the Richfaces tree component, because my client wants a special layout. My solution is a little bit strange. I share it here for someone which is in the same situation 😉 Here is the story …

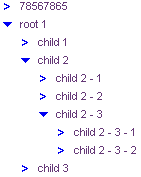
    Per default the rich:tree looks like a standard tree browser (i.e. explorer, eclipse, whatever):

    rich_tree_standard

    But I want this look:

    rich_tree_customized

    You see that the expand/collapse icon (rich_tree_expand) is on the same level with the node-icon (rich_tree_leaf). That’s very hard to fix this with CSS (it’s possible but i prefer my strange solution ;)). The Richfaces documentation describes which parts of a tree could be customize.

    We have:

    • rich-tree-node-handle and rich-tree-node-handleicon – a td which contains a link and a image to expand/collapse the node (only possible for a node not a leaf)
    • rich-tree-node-icon – is a td which contains the image for a node (a node with children)
    • rich-tree-node-icon-leaf – is a td which contains the image for a leaf (a node without children)

    I decide to move the expand/collapse icon from the handle-td to the icon-td and „simulate“ the user-click with Javascript:

    rich_tree_expand_move

    Listing 1 tree.xhtml:

    <rich:tree id="tree"
                  binding="#{treeBean.tree}"
                  var="item"
                  switchType="ajax"
                  ajaxSubmitSelection="true" 
                  toggleOnClick="false"
                  showConnectingLines="false"
                  disableKeyboardNavigation="true">
              
        <f:facet name="iconCollapsed">
           <!-- no image for collapsed --> 
           <rich:spacer width="0"  height="0" style="border: none;"/>
        </f:facet>
        <f:facet name="iconExpanded">
           <!-- no image for expanded --> 
           <rich:spacer width="0"  height="0" style="border: none;"/>
        </f:facet>
              
        
        <f:facet name="icon">
           <!--  use normal node icon to toggle expand/collapse -->
           <h:panelGroup>
              <h:graphicImage value="#{item.isLeaf ? '/images/leaf.gif' : '/images/collapsed.gif'}" 
                                     onclick="myToggleTreeNode(this);"
                                     rendered="#{!treeBean.isExpanded}"/>
              <h:graphicImage value="#{item.isLeaf ? '/images/leaf.gif' : '/images/expanded.gif'}" 
                                     onclick="myToggleTreeNode(this);"
                                     rendered="#{treeBean.isExpanded}"/>
           </h:panelGroup>
        </f:facet>
              
        <f:facet name="iconLeaf">
           <h:graphicImage value="/images/leaf.gif"/> 
        </f:facet>
              
        <rich:recursiveTreeNodesAdaptor roots="#{treeBean.roots}" var="item" nodes="#{item.children}">
           <rich:treeNode>
              <h:outputText value="#{item.name}"/>
           </rich:treeNode>
        </rich:recursiveTreeNodesAdaptor>
    </rich:tree>
    

    Listing 2 tree.js:

    function myToggleTreeNode(element) {
      var elem = jQuery(element);
      // img -> span -> td
      var parent = elem.parent().parent();
      var elementId = parent.attr("id");
      // i.e. j_id31:tree:j__id39:18::j_id40:icon -> the td arround the icon-image
      var index = elementId.lastIndexOf(":icon");
      var treeNodeId = elementId.substring(0, index);
      // i.e. j_id31:tree:j__id39:18::j_id40:handle -> the td arround the original expand/collapse-image
      var handleId = treeNodeId+':handle';
      // pure jQuery not working here
      var expandElement = jQuery($(handleId));
      expandElement.trigger("click");
    }
    

    Listing 3 tree.css:

    .rich-tree-node-handleicon {
      display: none;
    }
    
     
  • Andreas Höhmann 9:55 am Monday, 7. September 2009 Permalink |
    Tags: , , JSF 2, , ViewExpiredException   

    ViewExpiredException in JSF 1 and 2 

    Ed Burns beschreibt in seinem Blog wie man in JSF 2 selbst eine ViewExpiredException’s behandeln kann.

    Momentan (JSF < 2) kann die Standard-Fehlerbehandlung natürlich auch angepasst werden, z.B. durch Festlegung einer bestimmten Location pro Exception-Typ:

    <?xml version="1.0" encoding="UTF-8"?>
    <web-app version="2.5" xmlns="http://java.sun.com/xml/ns/javaee" xmlns:xsi="http://www.w3.org/2001/XMLSchema-instance"
      xsi:schemaLocation="http://java.sun.com/xml/ns/javaee http://java.sun.com/xml/ns/javaee/web-app_2_5.xsd">
      ...
      <error-page>
        <exception-type>javax.faces.application.ViewExpiredException</exception-type>
        <location>/pages/error/sessionexpired.xhtml</location>
      </error-page>
      ...
    

    In der von Ed vorgestellten Lösung wird ein eigener ViewExpiredExceptionHandler registriert, welcher den ursprünglichen Handler kapselt. In der dort überschriebenen void handle() wir eine ViewExpiredException mit einem Redirect (via Navigation-Handler) auf eine Fehlerseite beantwortet. In der Fehlerseite können Variable, die im Handler gesetzt wurden, für eine sinnvolle Fehlerbeschreibung verwendet werden.

    Beim Einsatz von Richfaces kann man diese Art von Fehler auch auf der Clientseite behandeln, beschrieben wird dies im Detail hier. Das Ganze ist mit zwei Erweiterungen machbar:

    1. die Funktion für den Client aktivieren

    <context-param>
      <param-name>org.ajax4jsf.handleViewExpiredOnClient</param-name>
      <param-value>true</param-value>
    </context-param>
    

    2. den Javascript-Code für die Behandlung zur Verfügung stellen:

    if (typeof(A4J) !== 'undefined' && typeof(A4J.AJAX) !== 'undefined'){
       // richfaces is available
       A4J.AJAX.onExpired = function(loc,expiredMsg) {
          var confirmMsg = 'Session expired.\n\nReload?';
          if (confirm(confirmMsg)) {
             window.location.reload();
          }
          // return false to inform "link-commands", that the user doesn't want to reload the page
          return false;
       };
    };
    
     
  • Andreas Höhmann 15:20 am Wednesday, 29. July 2009 Permalink |
    Tags: , value binding   

    JSF value binding 

    Today i will explain three types of value binding:

    • „direct“ value binding (one setter / getter for each value)
    • „list based“ value binding (one setter / getter for a list of values)
    • „map based“ value binding (one setter / getter for a map of values)

    Direct value binding

    This is the classic usage of value binding in jsf, the following facelets-snippet is self-explanatory:

    <h:inputText value="#{bean.foo}"/>
    <h:inputText value="#{bean.bar}"/>
    

    Our bean have a setter and a getter for foo and bar:

    class Bean {
      private String foo, bar;
      public String getFoo() ...
      public void setFoo(String) ...
      public String getBar() ...  
      public void setBar(String) ...
    }
    

    List based value binding

    I use this to avoid setter and getter for similar values/properties, i.e.

    <h:inputText value="#{bean.product[0]}"/>
    <h:inputText value="#{bean.product[1]}"/>
    <h:inputText value="#{bean.product[2]}"/>
    ...
    

    With the „classic“ value binding i have to write a lot of getter/setter (product0, product1, product2,…). But with list based value binding its much easier.

    class Bean {
      private static final int MAX_NUMBER_OF_PRODUCTS = 5;
      private final Product[] products = new Product[MAX_NUMBER_OF_PRODUCTS];
      public Bean () {
        for (int i = 0; i < MAX_NUMBER_OF_PRODUCTS; i++) {
        products[i] = null;
      }
     }
     public List<Product> getProduct() {
       return Arrays.asList(Product);
     }
    }
    

    The initialization of the internal array/list is necessary for correct working! During runtime jsf will access each value via index (0, 1, 2, …), a uninitialized list will throw a IndexOutOfBounds Exception.

    Map based value binding

    I used this type of value binding in a generic „CRUD list“ view to implement filtering in a rich:dataTable. I want a selectbox for each „filterable“ column:

    <rich:column>
     <f:facet name="header">
       <h:selectOneMenu value="#{bean.filterValue['foo']}">
          <f:selectItems value="#{bean.filterValues['foo']}" />
       </h:selectOneMenu>
     </f:facet>
     ...
    </rich:column>
    
    <rich:column>
     <f:facet name="header">
       <h:selectOneMenu value="#{bean.filterValue['bar']}">
         <f:selectItems value="#{bean.filterValues['bar']}" />
       </h:selectOneMenu>
     </f:facet>
     ...
     </rich:column>
    

    To get this to work we need a „customized“ map implementation:

    class ArrayMap<K, T> extends HashMap<K, T> {
       
       private static final long serialVersionUID = -5766406097936988242L;
       
       @Override
       public T get(final Object theKey) {
          if (!containsKey(theKey)) {
           // to avoid typos in the ui we throw a exception if a "unknown" value-name is used
            throw new IllegalArgumentException(String.format("The given value-name '%s' is not available", theKey));
          }
          return super.get(theKey);
       }
       public void put(final K key, final T value) {
          super.put(key, value);
       }
     }
    

    This ArrayMap have a getter and a setter (the „normal“ Map have only get and put), for jsf value binding we need a set and a get.

    Here is the final filter – bean:

    class FilterBean {
    
      /**
       * Contain all available filter-values for each supported filter-name.
       */
       private final Map<String, List<SelectItem>> filterValues = new ArrayMap<String, List<SelectItem>>();
    
       /**
        * Contain the current filter-value for each supported filter-name.
        */
       private final ArrayMap<String, Object> filterValue = new ArrayMap<String, Object>();
    
       public FilterBean() {
          initFilterValue();
       }
    
       /**
        * @return a map of lists with {@link SelectItem}s
        */
       public Map<String, List<SelectItem>> getFilterValues() {
         return filterValues;
       }
    
       /**
        * @return the map of filter values
        */
       public ArrayMap<String, Object> getFilterValue() {
         return filterValue;
       }
    
       /**
        * Prepare <tt>filterValue</tt>, add all supported filter-names to the list.
        */
        private void initFilterValue() {
          filterValue.set("foo", null);
          filterValue.set("bar", null);
        }
    
       /**
        * Prepare <tt>filterValues</tt>, the given list contains all rows for the datatable. 
        * Each filter-selectbox must show a unique list of available filter-values 
        * (per supported filter column).
        */
       public synchronized void initFilterValues(final List<T> theInitialFilterList) {
         filterValues.clear();
         filterValues.put("foo", getFilterSelectItemsFoo(theInitialFilterList));
         filterValues.put("bar", getFilterSelectItemsBar(theInitialFilterList));}
       }
    }
    

    The method initFilterValues(final List<T>) will be triggered from a external bean. Then the filter-bean can create a list of SelectItems for each filter-column.

    If the User select a value from such a filter-list the value binding will call our ArrayMap.set method.

    Try it 😀

     
  • Andreas Höhmann 17:59 am Wednesday, 22. July 2009 Permalink |
    Tags: Appear, Effect, Fadein, Fadeout, , , Scriptaculous   

    Fadein and Fadeout a Richfaces ModalPanel 

    Today i explain you a cool combination for rich:modalPanel and rich:effect.

    In the richfaces forum i found a article about a modalpanel with scriptaculous-effects („fade-in a modalpanel“). The answer was a link to the official richfaces demo-application (photoalbum). There we can find a login-dialog (svn source) with a „appear-effect“:

    <rich:modalPanel id="loginPanel"
    onshow="applyModalPanelEffect('loginPanel', appearFunc,{delay: 0.5, afterFinish: function(){$('loginPanelForm:username').focus();}})"
    styleClass="login-panel"
    showWhenRendered="#{authenticator.loginFailed}"
    width="400" height="150" autosized="true">
    <f:facet name="header">#{messages['login.login']}</f:facet>
    <f:facet name="controls">
    <h:panelGroup id="loginPanelHideControl">
    <h:graphicImage value="/img/modal/close.png" style="cursor:pointer"
    id="loginPanelhidelink" onclick="#{rich:component('loginPanel')}.hide();"/>
    </h:panelGroup>
    </f:facet>
    ...
    <rich:effect type="Appear" name="appearFunc"/>
    ...
    

    The javascript method applyModalPanelEffect can be found in the photoalbum.js (svn source):

    function applyModalPanelEffect(panelId, effectFunc, params) {
     if (panelId && effectFunc) {
     var modalPanel = $(panelId);
     if (modalPanel && modalPanel.component) {
     var component = modalPanel.component;
     var div = component.getSizedElement();
     Element.hide(div);
    effectFunc.call(this, Object.extend({targetId: div.id}, params || {}));}}
    }
    

    With this the rich:modalPanel will not shown immediately … it appears 😉 This was the „fade-in part“.

    I improved the code for the „fade-out part“, first the dialog:

    
    <!-- first the effects -->
    <rich:effect type="Appear" name="appearDialog"/>
     <rich:effect type="Fade" name="disappearDialog"/>
    
    <!-- to keep the dialog-code clean -->
    <c:set var="closeDialog" value="hideModalPanelWithEffect('myDialog',disappearDialog,{delay:0.1,duration:0.5})"/>
    
    <rich:modalPanel id="myDialog"
     onshow="showModalPanelWithEffect('myDialog',appearDialog,{delay:0.1,duration:0.5})"
     width="610" height="350" minHeight="350" autosized="true" shadowDepth="0">
    <f:facet name="controls">
    <h:panelGroup>
    <h:graphicImage value="/img/modal/close.png" style="cursor:pointer" onclick="#{closeDialog}"/>
    </h:panelGroup>
    </f:facet>
    </rich:modalPanel>
    

    and the javascript:

    function applyModalPanelEffect(panelId, effectFunc, params, hide) {
     if (panelId && effectFunc) {
     var modalPanel = $(panelId);
     if (modalPanel && modalPanel.component) {
     var component = modalPanel.component;
     var div = component.getSizedElement();
     if (hide) {
     Element.hide(div);
     }
     effectFunc.call(this, Object.extend( {targetId : div.id}, params || {}));}}
    }
    
    function showModalPanelWithEffect(panelId, showEffect, params) {
     applyModalPanelEffect(panelId, showEffect, params, true);
    }
    
    function hideModalPanelWithEffect(panelId, hideEffect, params) {
     var _params = params;
    _params['afterFinish'] = function(){Richfaces.hideModalPanel(panelId)};
     applyModalPanelEffect(panelId, hideEffect, params, false);
    }
    

    Now the dialog call showModalPanelWithEffect to fade-in and hideModalPanelWithEffect to fade-out.

    Try it 😀

     
  • Andreas Höhmann 17:13 am Monday, 22. June 2009 Permalink |
    Tags: Input, , , Reset,   

    Clear JSF Input Components 

    Beim Implementieren einer einfachen CRUD Anwendung mit Hilfe von Richfaces Datatable und ModalPanel bin ich über ein „Problem“ mit validierten (leeren) Eingabefeldern gestolpert.

    Das Problem ist eigentlich kein richtiges Problem, sondern das Standardverhalten von JSF 🙂 Unschön wird es wenn man einen rich:modalPanel als Edit-Dialog einsetzt und diesen wiederverwendet.

    Der grobe Aufbau:

    • eine DataTable zeigt eine Liste von Entities (z.B. mit Hilfe eine DAOs geladen)
    • jedes Entity hat eine eindeutige ID (z.B. PrimaryKey aus JPA)
    • pro Tabellenzeile gibt es einen „Edit“-CommandLink der eine rich:modalPanel für das Editieren eines Entity öffnet
    • vor jedem Edit muss die gewünschte Entity in einen CrudManager (Session-Scoped Bean) gelangen, aus der sich der Edit-Dialog mit Daten versorgen kann und mit dessen Hilfe die eigentliche Edit-Aktion durchgeführt wird

    Nun sollen bestimmte Eingabefelder im Edit-Dialog validiert werden (z.B. mit einer @NotEmpty Annotation an den ensprechenden Properties der Entitiy-Klasse). Wenn man nun den Dialog für eine Entity mir der ID ‚1‘ öffnet und eine Validierungsfehler auslöst, z.B. durch das Abschicken mit leeren Eingabefeldern, wird dieser Fehler ausgegeben … soweit so gut. Der Dialog kann dann geschlossen werden. Soll nun Entity mit der ID ‚2‘ mit dem gleichen Dialog editiert werden, sind die Eingabefelder immer noch leer und nicht wie gewünscht mit den Werten aus Entity-2 gefüllt. Warum?!

    Nach einer kurzen Googlesuche landete ich auf der Seite http://wiki.apache.org/myfaces/ClearInputComponents die den Effekt beschreibt. Der Grund für das Verhalten ist die Zwischenspeicherung von „SubmitedValues“ in den jeweiligen UIComponents (z.B. h:inputText). Die werden den eigentlichen Modeldaten vorgezogen.

    Will man nun einen immer aktuellen Edit-Dialog haben, gibt es verschiedene Möglichkeiten (siehe MyFaces). Ich habe mich für die „radikal einfache“ Lösung entschieden … lösche alle Elemente innerhalb des Edit-Dialogs und lasse sie immer neu erzeugen.

    Die Entity-Liste besteht aus einer rich:dataTable, pro Zeile ein a4j:commandButton:

    
    <rich:dataTable value="#{tableManager.model}" var="dataItem">
    
    <!-- Edit-Command Column -->
    <rich:column sortable="false">
    <a4j:commandButton ajaxSingle="true" limitToList="true"
    reRender="foobar_editPanel"
    oncomplete="Richfaces.showModalPanel('foobar_editPanel')"
     actionListener="#{crudManager.onEdit}">
     <f:attribute name="onEditClearTarget" value="foobar_editPanel"/>
     <f:setPropertyActionListener value="#{dataItem}" target="#{crudManager.currentEntity}" />
    </a4j:commandButton>
    
    <!-- more Columns ... -->
    </rich:dataTable>


    Der tableManager liefert die Entity-Daten, also eine Liste von Entity-Beans, jede Bean hat eine eindeutige ID. Der crudManager enthält stellt die gesamte CRUD Funktionalität zur Verfügung. Für eine Edit muss er mit einer Entity „initialisiert“ werden, dies geschieht via f:setPropertyActionListener. Das reRender bewirkt, dass der Edit-Dialog aktuallisiert wird.

    Der Edit-Dialog wird mit Hilfe von rich:modalPanel erzeugt (foobar_editPanel) und enthält eine Reihe von h:inputText Elementen. Diese sind wiederum an den crudManager gebunden.

    Der Code für das Zurücksetzen der Inputelemente im Edit-Dialog ist ebenfalls im crudManager verborgen und sieht folgendermaßen aus:

    
    public abstract class AbstractCrudManager {
    
    public static final String ONEDIT_ATTRIBUTE_CLEARTARGET = "onEditClearTarget"; //$NON-NLS-1$
    
    /**
    <ul>
    <li>Event-handler will be triggered on <tt>edit</tt>. This method is used as a</li>
    <li>{@link ActionListener} and will be called before a <tt>edit-view</tt> is</li>
    <li>shown. So here we can do some "initializations" for the edit-view, i.e.</li>
    <li>reset input-fields.</li>
    <li></li>
    <li></li>
    <li>This base implementation will call {@link #clearEditTarget(UIComponent)}.</li>
    <li></li>
    <li></li>
    <li>@param aEvent</li>
    </ul>
    
    
     *          is never <code>null</code>
     */
    public void onEdit(final ActionEvent aEvent) {
    clearEditTarget(aEvent.getComponent());
     }
    
    /**
    <ul>
    <li>This method handle a edit-form-clear. Per default the command-button which delegates to the</li>
    <li>edit-view could have a attribute {@link #ONEDIT_ATTRIBUTE_CLEARTARGET}.</li>
    <li></li>
    <li>@param theSourceComponent</li>
    </ul>
    
    
     *          is never <code>null</code>
     */
     protected void clearEditTarget(final UIComponent theSourceComponent) {
     final String onEditTarget = (String) theSourceComponent.getAttributes().get(ONEDIT_ATTRIBUTE_CLEARTARGET);
     if (onEditTarget == null) {
     return;
     }
     final UIComponent editTarget = FacesContext.getCurrentInstance().getViewRoot().findComponent(onEditTarget);
     if (editTarget == null) {
     return;
     }
     editTarget.getChildren().clear();
     }
    
    ...
    
    }


    Damit ist auch klar was das <f:attribute name=“onEditClearTarget“ value=“#{id}_editPanel“/> bewirkt … es definiert die UI-Komponente die vor dem Öffnen des Dialogs zurückgesetzt werden soll.

    Damit wird bei jedem Klick auf „Edit“ ein Ajax-Request zum Server geschickt, dort wird die aktuelle Entity in den crudManager hinterlegt, es wird onEdit aufgerufen und damit der Inhalt des Edit-Dialogs gelöscht. JSF sorgt dann beim RenderResponse wieder dafür, dass alle UI Componenten korrekt erzeugt werden. Da dann alle Eingabeelement noch vollkommen „neu“ sind, zeigen diese auch die Werte aus dem Modell an.

     
c
Neuen Beitrag erstellen
j
nächster Beitrag/nächster Kommentar
k
vorheriger Beitrag/vorheriger Kommentar
r
Antworten
e
Bearbeiten
o
zeige/verstecke Kommentare
t
Zum Anfang gehen
l
zum Login
h
Zeige/Verberge Hilfe
Shift + ESC
Abbrechen